Sunday, September 14, 2014

Purple power

Let me gush for a moment, I am honoured that I got to make this ring and ecstatic with the way it turned out! I am normally forgetful about taking pictures of pieces while I am creating them, but I was so giddy at every step of the way that I took quite a few process pictures for all to enjoy. My heartfelt congratulations go out to the newly engaged couple Laura and Josh! You were both such great collaborators, you made my job really easy.
The first design consideration centered around gem choice. When designing a ring it is very dependent on the shape, size, and I would say colour(s!) of the gems so there was a bit of back of forth about colour choices and shape consideration. This is the first grouping of gem choices I offered. On the table were square or oval cuts, I threw the Asscher cut in as an option and I'm glad I did because it became the main contender.

I suggested sapphire because the combination of colour and hardness works really well for a ring. Here you can see the purple Asscher cut Sapphires and a gradation of ruby/sapphires 

With gem choices set I made some sketches to help decide on a design.  I quickly came up with idea #3 and rounded it out with a couple options to choose from keeping in mind my simplicity + combination of antique/modern directives. Along with sketches I like to remind customers that they are a starting point. Adjustments can be made, altogether new sketches can be drawn up, it should be just perfect before creating!
My lovely client immediately chose design 3 and let me know about adjustments that she wanted on the band of the ring, she was able to send me a sketch of the change that she wanted and I let her know that I could easily incorporate it into the design.
Here is a view of the wax I carved, I sent these pics for approval before casting them in gold. This is a great shot of the bottom detail.
The height of the design was a particular concern, so I made sure to send along a photo of the setting height and after getting a reply to move forward it was all systems go!


It broke! Nah. I had made the decision to cast the setting and band separately. This is right after casting and cutting it away from the sprues so it looks a little blah...
Here it is after some sprucing up and I couldn't resist placing the gem in the setting to check on my carving.


After some emerying I soldered the two parts together (in the background you can see my quenching mug :oP).


Here we have the ring finally looking lovely after polishing, including my compound covered fingertips. What lovely nails I have.
Post polish shininess.

The first pic I took after the gems had been set. Oh la la.
AND NOW THE FINISHED PIECE! 


Wednesday, May 29, 2013

New Life

Our New Life exhibition is coming to an end at Jewel Envy.  The exhibition was a part of the Toronto International Jewellery Festival and SNAG 2013 Conference.  Coming this Monday I will be clearing out the cases and replacing them with our regular work.  I feel guilty about letting my blog fall to the wayside... Here are my excuses: In the past year I have moved into a new apartment AND the studio I manage - Jewel Envy has moved into a new location.  I am a creature of habit.  The change of environment hasn't tampered with my creative spurts, but my web presence (what little there is) fell off my radar.  I hope this won't be the case and my next update will not be spaced out so far.

Okay! enough with the excuses and ramblings.  I present to you my work and artist statement from New Life.
HANSEL / Vitreous enamel on copper using cloisonne technique, Sterling silver, steel pinback, flocking

ZSADIST / Vitreous enamel on copper using cloisonne technique, Brass, steel pinback, flocking, various chain
MAXIMUS LEONIDAS / Vitreous enamel on copper using cloisonne technique, leather, seed pearls, sterling silver


I am a proponent of the cult of new domesticity.  I have a feverish DIY spirit that keeps me up some nights to randomly bake a batch of cinnamon buns made from scratch or cut apart a pile of cardboard to create a shoe rack.  On the flip side of things I would hardly say that I have bolted upright before dawn to accomplish a DIY project, but there have been a few rare incidences.  That is until I volunteered to maintain my sister’s farm while she was out of town.  There was no question in my mind how much I wanted to do this.  I had reaped the rewards of her laying hens, ridden on her horses, and helped out in the first couple of days when her goats gave birth to their kids.  Now I would be there every day to care for her brood of animals.  I would have to wake up at the crack of dawn to feed them all.  And not to mention all that horse poop.  Seriously, there are hills behind the barn composed of horse poop.

Of the things I learned:

Having the hose handy while feeding the goats is paramount.  They are more excited and friendly when you are bringing them food and lunging goat hooves don’t feel so nice.

 Zsadist the horse will bend to your will if you offer him a treat, this includes clumsily trying to put a horse blanket on him when it’s something you have never done before.

Never leave anything on the kitchen counter that can be consumed.  This includes and is not limited to used Kleenex and sticks of butter.  Adding to the weight of Maximus means you run the risk of being squished when he is in lap dog mode.

The sense of accomplishment and pride of the daily labour involved is like no other that I have felt.  Neither have I ever slept so well.  My temporary new life has instilled a deeper curiosity and appreciation for the rise in small farming ventures and an examination of how animals are cared for on a larger scale for mass consumption.  However, I am (with a twinge of guilt) grateful that I now have the option to sleep in on the weekend.

List of animals:
Dogs: Maximus Leonidas (Bernese Mountain Dog), Detective Olivia Benson (Miniature Dashchund)
Cats: Death Wish Kitty, Tip, Boo, Bob, Zoob (barn cats), Socket Plug (indoor cat)
Horses: Zsadist, Avalon
Goats: Gert, Hansel, Katinka, Tony, Levi
Sheep: 41, 42
Fowl:  24 ducks, Dindin (sole rooster), 8  chickens, 6 guinea fowl

Check out: newdomesticity.com

AND I have yet to read, but am going to go ahead and plug: Homeward Bound by Emily Matchar

In her own words:

"An examination of the fascination with reviving “lost” domestic arts like canning, bread-baking, knitting, chicken-raising, etc. Why are women of my generation, the daughters of post-Betty Friedan feminists, embracing the domestic tasks that our mothers and grandmothers so eagerly shrugged off? Why has the image of the blissfully domestic supermom overtaken the Sex & the City-style single urban careerist as the media’s feminine ideal? Where does this movement come from? What does it mean for women? For families? For society?"                        

Monday, July 9, 2012

Post TOAE

After typing in the title for this installment of my blog a vision of a post-apocalyptic world sprang into my mind.  Myself scaling decaying glass, steel and cement structures, heading towards the nearest forest cover where my feet will eventually reach an expanse of natures most beautiful creation, grass.  I can imagine the damp cool feeling between my toes and the comfort of the slight give of the soil beneath my feet. There may or may not be zombies in the vicinity, or the threat of an unknown military attack that I will somehow miraculously survive through again, but in that moment I am happy.   

Okay, I digress greatly.  This is all coming to mind after participating in the Toronto Outdoor Art Exhibit for the past three days and standing on a cement square for 30 + hours.  My feet are KILLING me. STILL.  I should have mentioned before my strange tangent that you should probably just skip through to my pictures and captions for a normal post about some of my most current work. If you are one of the lucky ones you have done that already.  In all seriousness though, grass is marvelous and if you need convincing please borrow, rent or buy the Planet Earth series to watch the segment about grass. Your welcome.

I would like to thank everyone who came out to visit and support me, anyone who bought any of my work, stopped by to give me treats, or lent a helping hand during the show.  If you are stumbling across this after taking away one of my postcards please do not hesitate to contact me with questions or comments concerning my work.  After wandering through my blog a bit your will most likely notice that I love creating custom pieces so don't hesitate to get in touch for a special creation!  alexis.glaciale@gmail.com

This past weekend was a great success and I had such a blast interacting with people and talking about my work.  My sister took a break from her myriad of responsibilities to help me out and spend time with me all day on Friday (my birthday) in the blistering heat <3(love ya, sis!)<3  

"Night Owl" Double sided hand painted enamel necklace with handmade chain

Here you can get a sense of the volume.  The enamel components have been set in sterling silver bezels.

Enamel and Uvarovite ring.  Uvarovite is a type of garnet... I just love how unreal the green colour of it is.  Reminds me of grass ;oP

Here you can glimpse the sterling silver band that I fabricated for the settings on top.  The shape makes it awkward to get a good picture of.  You could always come and visit me in the studio to see it in person!

"Whoop-a-Daisy!"
Here again you can see the volume of the pendant on the necklace.

This is the reverse side of the same necklace.

Thursday, May 10, 2012

Interchangeable Rings

I am super excited about my upcoming participation in the Toronto Outdoor Art Exhibition, so I will be updating more frequently leading up to the event in July with the work I will be making.  My picture taking skills are getting better, but I hope that a glimpse at these works gets you excited to see it in person at the show!

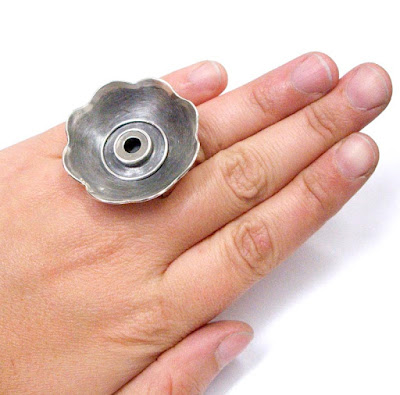
The rings in this post have been in the making for a while.  I had the enamel components made a couple of months ago.  They were all fabricated using a copper base and copper wire for the cloisonné.  As you can see in the first image I set the enamel pieces onto sterling silver bases that have a magnet in the bottom of the form.  Just this afternoon I finished creating the two rings that are the vessels for the interchangeable enamel components.  I am giddy with excitement over their completion.  It is extremely satisfying letting the magnets snap into place - an experience that must be felt to be understood (or possibly just all in my head!)

Here you can see the magnets set in the bottom center of the enamel pieces.
The front of the Flower set.  Cloisonné Enamel on Copper and set in sterling silver.
Flower Ring, hand fabricated in sterling silver

Flower ring worn "bare."  You can see the magnet set in the center.


Food set.


Yummy... spaghetti and meatballs.


Save the best for last - chocolate cake, Mmm


Tuesday, March 20, 2012

Jenna

After concentrating my attention on creating my evil eyes (in the post below) I decided to embrace basic enamel techniques.  Focusing on the colour combinations to make a necklace for my friend Jenna's birthday.  This piece was created with vitreous enamel that I sifted onto each side of the pieces that are hand cut from copper.  You can flip the necklace and have a slightly different look.


Happy Birthday Jenna!
We never need an excuse to watch scary movies together.

Tuesday, March 13, 2012

Superstition

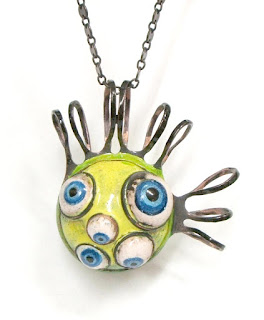
After coming back from vacation and working nonstop on my Toronto Outdoor Art Exhibit application for the week leading up to the due date I didn't think that I was going to be creating any work to submit to Zilberschmuck's themed show that was due the following week.  Especially since I didn't initially have any ideas.  My mom came up with a great suggestion to make a garlic necklace and I was riding out that idea in my head before I thought about making evil eye jewellery while walking to the studio last Tuesday.  Most likely fueled by my lack of sleep (my own fault).  I am addicted to Top Chef and I "had to" watch the two episodes leading to the finale even though I have to wake up early on Tuesdays to open the studio.  Asinine, I know.  Apparently sleep deprivation leads to the impossible - attempting enameling things together that you have never done before.  The brooch was the result of painting a dapped copper circle.  Then there was the mutant eyeball. I had myself convinced that using a strong binder like A4 - which is like a glue that holds enamel in place - would also hold smaller dapped forms onto larger ones.  This is not the case.  It seemed like it was going to do the trick but after a few seconds in the kiln they slid off.  Time for a creative solution.  I decided that some well placed and carefully sized rings of cloisonne might do the trick and they did just that, phew!  The eyeballs did migrate a bit during the firing in the kiln so I kept a close watch on them and after a few attempts got the effect that I was hoping for.  I cannot overstate how much in love I am with the chartreuse colour of the mutant eyeball.  The finished product is equal parts nouveau zombie and world of goo which makes me smile.  Semi related side note: I was uber excited that Lianne was in the studio today so that I could gush and discuss the latest episode of the Walking Dead.

Back of the brooch, yay handmade pinbacks!

I see you.

Here's looking at you, kid.

It's a mutant!

Flip side

Side view awesomeness.


So, I present to you my submissions for Superstition.  Their arrival comes after two failed attempts, one melted piece, one ridiculously ass backward fabricated ring, and another ring that got close to being finished.  That is until I decided to plunk the eyeball in place to see how it would look disregarding that it was not yet polished and there was no way to remove the eye without damaging it... sigh.

The brooch and pendant ended up being made from scraps of metal that are cast-offs after punching out discs... great for creating eyelashes apparently.  And that chain that I thought I hated some how worked out just right for the final touch.  I often find that when I am scrounging for materials and trying to throw things together that I wouldn't have initially thought of while drawing out a design I end up much more satisfied about the results.           

Tuesday, December 13, 2011

Dog Charm


Woof! woof!!
Meet Picasso, one of my recent custom orders.
I have been finishing some last minute holiday commissions before I leave the city for some family time in the country.  I was excited to work on a piece that will be dangling from the charm bracelet that also holds the gargoyle charm I made a while ago.  I took a shot of the wax before I casted the charm in 18 karat yellow gold.  I ended up using two different types of wax - the blue wax I could carve into using wax burs on my flex shaft as well as dental tools that I use for carving and then the pink wax on the ears.  The pink were tiny wax sheet pieces that I folded and then bonded to the blue wax by melting it in place.  The dog became more and more delicate to carve as he got smaller and I ended up having to give him surgery a few times when almost all his legs fell off, but I think he definitely ended up being well worth the effort.  I am especially proud of the texture I gave his shiny gold fur.