After coming back from vacation and working nonstop on my
Toronto Outdoor Art Exhibit application for the week leading up to the due date I didn't think that I was going to be creating any work to submit to
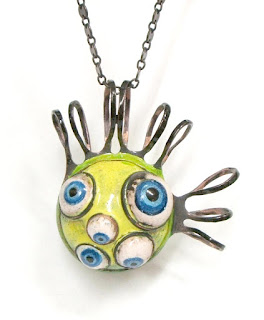
Zilberschmuck's themed show that was due the following week. Especially since I didn't initially have any ideas. My mom came up with a great suggestion to make a garlic necklace and I was riding out that idea in my head before I thought about making evil eye jewellery while walking to the studio last Tuesday. Most likely fueled by my lack of sleep (my own fault). I am addicted to Top Chef and I "had to" watch the two episodes leading to the finale even though I have to wake up early on Tuesdays to open the studio. Asinine, I know. Apparently sleep deprivation leads to the impossible - attempting enameling things together that you have never done before. The brooch was the result of painting a dapped copper circle. Then there was the mutant eyeball. I had myself convinced that using a strong binder like A4 - which is like a glue that holds enamel in place - would also hold smaller dapped forms onto larger ones. This is not the case. It seemed like it was going to do the trick but after a few seconds in the kiln they slid off. Time for a creative solution. I decided that some well placed and carefully sized rings of cloisonne might do the trick and they did just that, phew! The eyeballs did migrate a bit during the firing in the kiln so I kept a close watch on them and after a few attempts got the effect that I was hoping for. I cannot overstate how much in love I am with the chartreuse colour of the mutant eyeball. The finished product is equal parts
nouveau zombie and
world of goo which makes me smile. Semi related side note: I was uber excited that
Lianne was in the studio today so that I could gush and discuss the latest episode of the Walking Dead.
 |
| Back of the brooch, yay handmade pinbacks! |
 |
| I see you. |
 |
| Here's looking at you, kid. |
 |
| It's a mutant! |
 |
| Flip side |
 |
| Side view awesomeness. |
So, I present to you my submissions for Superstition. Their arrival comes after two failed attempts, one melted piece, one ridiculously ass backward fabricated ring, and another ring that got close to being finished. That is until I decided to plunk the eyeball in place to see how it would look disregarding that it was not yet polished and there was no way to remove the eye without damaging it... sigh.
The brooch and pendant ended up being made from scraps of metal that are cast-offs after punching out discs... great for creating eyelashes apparently. And that chain that I thought I hated some how worked out just right for the final touch. I often find that when I am scrounging for materials and trying to throw things together that I wouldn't have initially thought of while drawing out a design I end up much more satisfied about the results.


 Lately I have been extremely creatively scattered. I have been burning myself out by making things at home - stenciling some handmade pillows, cutting linoleum prints, and doing some painting. Also, attempting to organize things to avoid working. I spent way too many hours online scouring for a new duvet cover. Go ahead and judge me. However, since I painted my bedroom I have been in need of something that matches the new colour (insert rampant consumer jab here). In between my online journeying i whipped up some enamel paintings. I should also let everyone in on the fact that I was watching Battlestar Galactica while doing so. The skull was a connection to my ongoing obsession with the Dias de los Muertos. I have been contemplating getting more tattoos lately, hence the tattoo designs. I'm sure my mom appreciates them being painted on jewellery rather than on me. My years of drawing henna tattoos have been put to use once again! The one thing I found out about enamel that I hadn't known before is that red and white enamel repel... if you are lucky you can catch it before it happens (which is why you are seeing this batch of pieces and not the last ones I made - now lost to the light of day and never to be seen again). Enamel is not always predictable and or reliable. I left the bird piece in the kiln a tad too long, and it developed a speckly quality that I had not initially intended.
